Difference between revisions of "Securelink gatekeeper setup"
Pcartwright (talk | contribs) |
David.Irwin (talk | contribs) |
||
| (27 intermediate revisions by 5 users not shown) | |||
| Line 1: | Line 1: | ||
| − | Galen Healthcare uses a solution called Securelink to allow us to connect | + | ==Description== |
| + | Galen Healthcare uses a solution called '''Securelink''' to allow us to connect, maintain, upgrade and monitor your servers. Installing Securelink also provides us the ability to pull data in order to onboard practices to their state Health Information Network. (HIE) | ||
| − | Installing Securelink on your | + | Installing Securelink on your network is a two step process: Once these two steps are complete, Galen will be able to securely access your machines without the need for additional VPN software or proprietary clients. Here is a detailed description of the two steps: |
| + | #Activate Gatekeeper user account | ||
| + | #Install the Securelink Gatekeeper software. | ||
| − | + | If you encounter any problems along the way, you can contact your Galen resource or by email at [mailto:help@galenhealthcare.com help@galenhealthcare.com]. | |
| − | ' | + | ==Detailed Instructions== |
| + | ===Activate Gatekeeper User Account=== | ||
| + | #You should receive an email asking you to activate your SecureLink Gatekeeper user. | ||
| + | #Click the "Activate your account" link in the email | ||
| + | #On the login screen, enter the letters you see in the image and click "Login" | ||
| + | #Fill out the form, including entering passwords twice. Click "Save" | ||
| + | #Under "My gatekeepers" you should see a list of available gatekeepers. On the right-hand side, you'll see a "Download" link. Click that to download the SecureLink setup file. | ||
| + | #Under "Download Gatekeeper for platform", choose "Windows" | ||
| − | + | ===Install the Securelink Gatekeeper software=== | |
| − | ''' | + | #Determine which machine you'd like to install your Gatekeeper on. |
| + | #*NOTE: It cannot be installed on a server that already has another SecureLink Gatekeeper installed. | ||
| + | #Copy the SecureLink setup file to the desktop of the server server. You can also log onto https://securelink.galenhealthcare.com/rss-servlet from the server and log in to download the software. | ||
| + | #Run the executable '''SLinkGalen.exe''' that you just downloaded. Click Next to begin the installation: | ||
| + | #:[[File:slimage5.jpg]] | ||
| + | #Choose the Standard installation: | ||
| + | #:[[File:slimage6.jpg]] | ||
| + | #When the install has concluded, click 'Finish' to launch the gatekeeper. This will launch the Gatekeeper menu in a browser: | ||
| + | #:[[File:slimage7.jpg]] | ||
| + | #After the Gatekeeper performs its connectivity test, enter the registration code provided by Galen Healthcare Solutions and click ‘Register’ | ||
| + | #:[[File:slimage8.jpg]] | ||
| − | + | ===Managing Gatekeeper=== | |
| − | + | You can review audit logs, create additional Gatekeeper users, change notification options, and access schedules by logging into your SecureLink account that you activated above. The address is [https://securelink.galenhealthcare.com https://securelink.galenhealthcare.com]. | |
| − | |||
| − | |||
| − | |||
| − | |||
| − | |||
| − | |||
| − | |||
| − | |||
| − | |||
| − | |||
| − | |||
| − | |||
| − | |||
| − | |||
| − | |||
| − | |||
| − | |||
| − | |||
| − | |||
| − | |||
| − | |||
| − | |||
| − | |||
| − | |||
| − | |||
| − | |||
| − | |||
| − | |||
| − | |||
| − | |||
| − | |||
| − | |||
| − | |||
| − | |||
| − | |||
| − | |||
| − | |||
| − | |||
| − | |||
| − | |||
| − | |||
| − | |||
| − | |||
| − | |||
| − | |||
| − | |||
| − | |||
| − | |||
| − | |||
| − | |||
| − | |||
| − | |||
| − | |||
| − | |||
| − | |||
| − | |||
| − | |||
| − | |||
| − | |||
| − | |||
| − | |||
| − | |||
| − | |||
| − | |||
| − | |||
| − | |||
| − | |||
| − | |||
| − | |||
| − | |||
| − | |||
| − | |||
| − | |||
| − | |||
| − | |||
| − | |||
| − | |||
| − | |||
| − | |||
| − | |||
| − | |||
| − | |||
| − | |||
| − | |||
| − | |||
Revision as of 17:35, 16 August 2018
Description
Galen Healthcare uses a solution called Securelink to allow us to connect, maintain, upgrade and monitor your servers. Installing Securelink also provides us the ability to pull data in order to onboard practices to their state Health Information Network. (HIE)
Installing Securelink on your network is a two step process: Once these two steps are complete, Galen will be able to securely access your machines without the need for additional VPN software or proprietary clients. Here is a detailed description of the two steps:
- Activate Gatekeeper user account
- Install the Securelink Gatekeeper software.
If you encounter any problems along the way, you can contact your Galen resource or by email at help@galenhealthcare.com.
Detailed Instructions
Activate Gatekeeper User Account
- You should receive an email asking you to activate your SecureLink Gatekeeper user.
- Click the "Activate your account" link in the email
- On the login screen, enter the letters you see in the image and click "Login"
- Fill out the form, including entering passwords twice. Click "Save"
- Under "My gatekeepers" you should see a list of available gatekeepers. On the right-hand side, you'll see a "Download" link. Click that to download the SecureLink setup file.
- Under "Download Gatekeeper for platform", choose "Windows"
Install the Securelink Gatekeeper software
- Determine which machine you'd like to install your Gatekeeper on.
- NOTE: It cannot be installed on a server that already has another SecureLink Gatekeeper installed.
- Copy the SecureLink setup file to the desktop of the server server. You can also log onto https://securelink.galenhealthcare.com/rss-servlet from the server and log in to download the software.
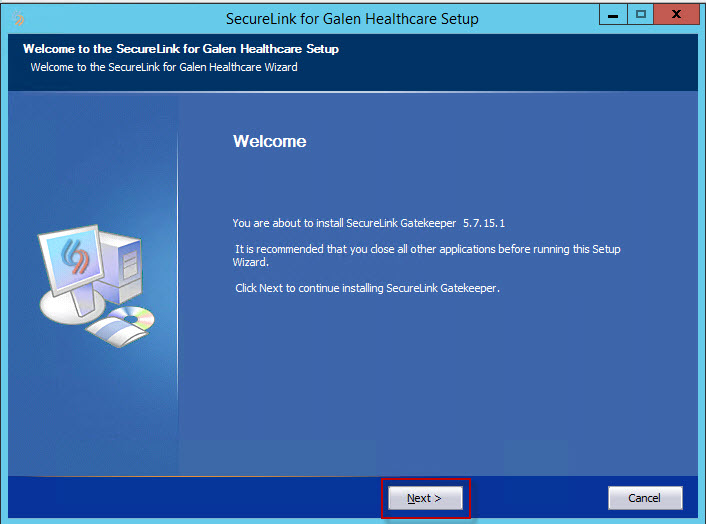
- Run the executable SLinkGalen.exe that you just downloaded. Click Next to begin the installation:
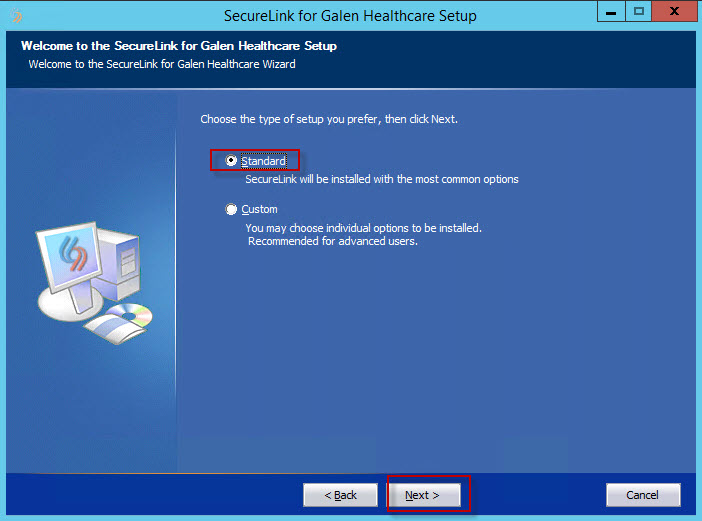
- Choose the Standard installation:
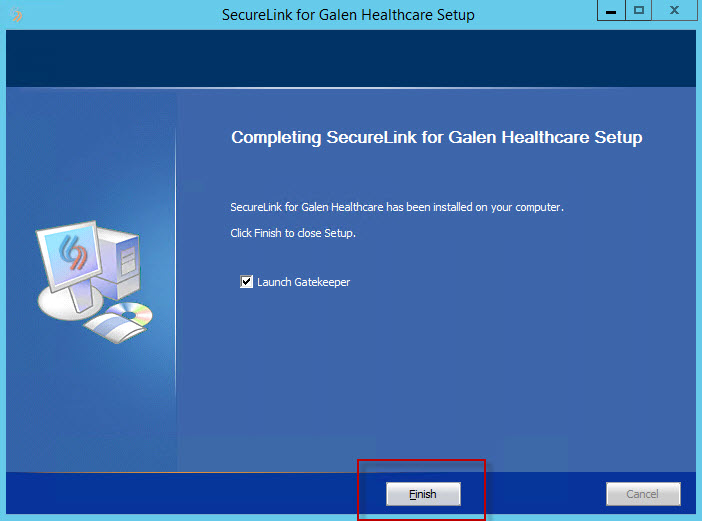
- When the install has concluded, click 'Finish' to launch the gatekeeper. This will launch the Gatekeeper menu in a browser:
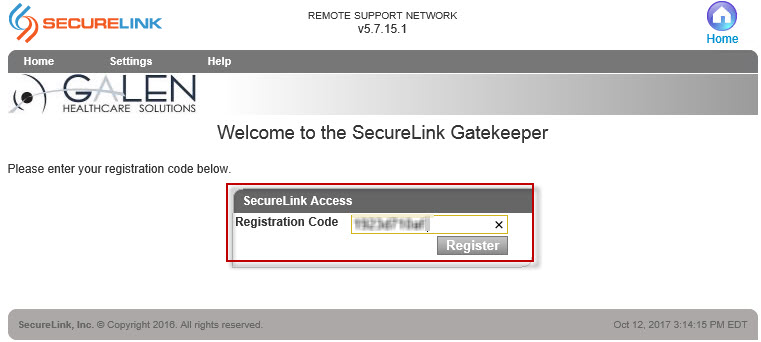
- After the Gatekeeper performs its connectivity test, enter the registration code provided by Galen Healthcare Solutions and click ‘Register’
Managing Gatekeeper
You can review audit logs, create additional Gatekeeper users, change notification options, and access schedules by logging into your SecureLink account that you activated above. The address is https://securelink.galenhealthcare.com.


