Difference between revisions of "Impact OCR Installation"
Jump to navigation
Jump to search
John.Buckley (talk | contribs) |
John.Buckley (talk | contribs) |
||
| (17 intermediate revisions by the same user not shown) | |||
| Line 1: | Line 1: | ||
__TOC__ | __TOC__ | ||
==Installation== | ==Installation== | ||
| − | # Find and run the '''Impact 3.31 Setup.exe'''. ''Note: You may need to download the Touchworks Scan [version].exe file from one of the various Allscript's FTP sites.'' | + | Note: Please be advise, it is strongly recommended that OCR should be installed on a server other than the the server hosting the Scan Application. |
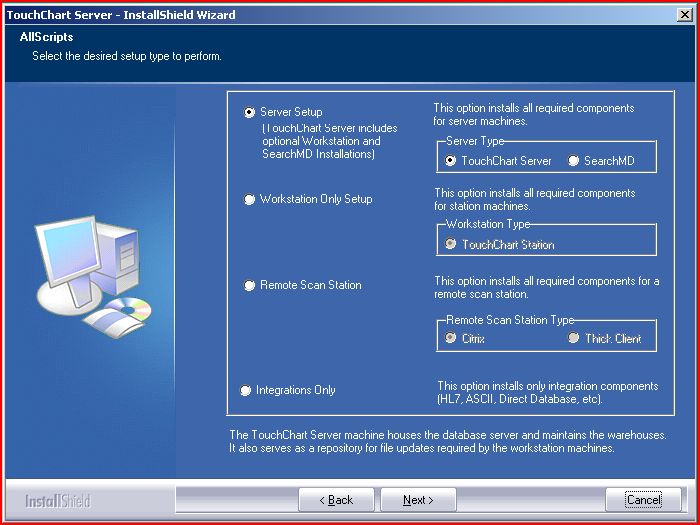
| − | # Select the '''Server Setup''' radio button (this may be the default selection) | + | # Find and run the '''Impact 3.31 Setup.exe'''. ''Note: You may need to download the Touchworks Scan [version].exe file from one of the various Allscript's FTP sites.''<br />[[Image:Ocr first Full.JPG]] |
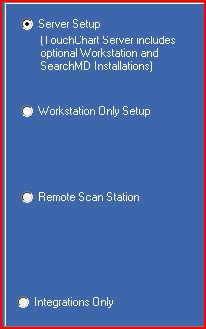
| + | # Select the '''Server Setup''' radio button (this may be the default selection).<br />[[Image:Ocr first setup.JPG]] | ||
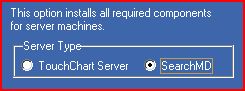
| + | # Select the SearchMD radio button (top right side of page, under Server Type).<br />[[Image:Ocr first components.JPG]] | ||
| + | # Select the ''Next'' button. | ||
| + | # Verify the installation path.<br />[[Image:Ocr destination folder.JPG]] | ||
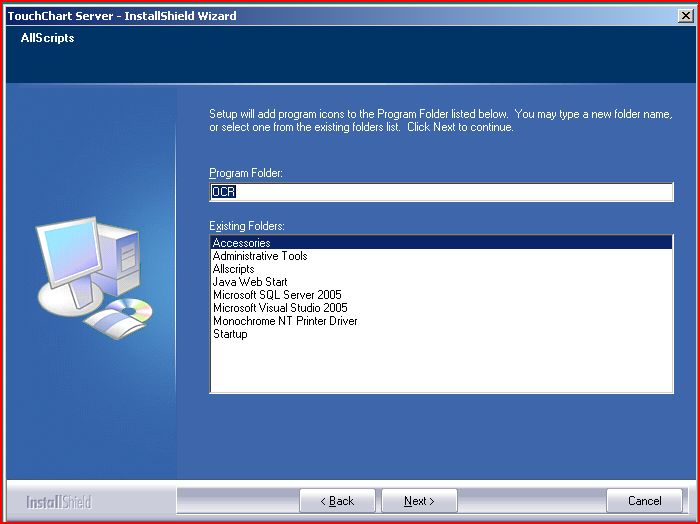
| + | # Using the default settings, confirm that the Program Folder is listed as OCR. <br />[[Image:Ocr program folder.JPG]] | ||
| + | # Select the ''Next'' button. | ||
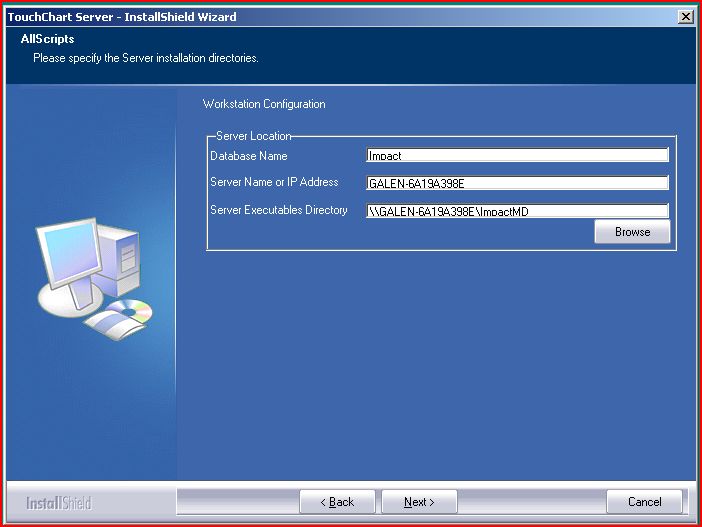
| + | # Provide the database connection information for both the Database name (will like be Impact), as well as 'Server Name or IP Address' -- this is the ''Server Name or IP Address'' to the Database Server. In addition, add the path to the shared Impact folder. ''Note: the default settings may not be correct.''<br />[[Image:Ocr database setup.JPG]] | ||
| + | # Select the ''Next'' button. | ||
| + | # Verify all information provided is correct. | ||
| + | # Select the ''Next'' button. | ||
==Configuration== | ==Configuration== | ||
| − | ===SQL 2000=== | + | ===OCR Configuration Tool=== |
| + | # Run the '''OCR Configuration''' shortcut that was placed on the server's desktop at the completion of the OCR install. | ||
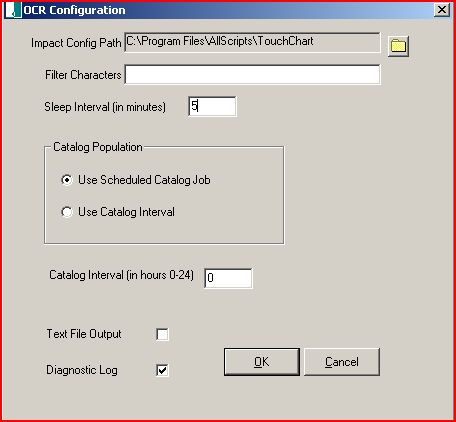
| + | # Verify the following configuration settings:<br />[[Image:Ocr configuration.JPG]] | ||
| + | ## '''Impact Config Path''' - define where the Impact application is running (use Browse button to locate application. Specify UNC format) | ||
| + | ## '''Filter Characters''' - specify characters to remove from OCR consideration (no spaces or other characters between items) - Leave blank | ||
| + | ## '''Sleep Interval''' - specify the number of minutes to wait before checking for documents to be OCR processed (whole positive numbers only) - Set to 5 | ||
| + | ## '''Catalog Population''' - specify how to update Full-Text Search indexes. Select – “''Use Scheduled Catalog Job”'' | ||
| + | ## '''Catalog Interval''' - specify how often to update Full-Text Search indexes when Use Catalog Interval option is selected. Disregard this setting. | ||
| + | ## '''Text File Output''' - check this box to write to the application directory, a text file for each document containing the set of recognized words - '' Leave unchecked'' | ||
| + | ## '''Diagnostic Log''' - check this box to write to the application directory, a text file (OCRDebug.log) containing debug information for tech support - ''Leave checked until installation is verified, then uncheck''. | ||
| + | |||
| + | ===SQL 2000 Full-Text Index=== | ||
| + | # Open SQL 2000 Enterprise Manager. | ||
| + | # Find and Expand the '''Impact''' database. | ||
| + | # Select Tables and locate the Table named ''OCR_Contents''. | ||
| + | # Right-click on the ''OCR_Contents'' and select '''Full-Text Index Table'''. | ||
| + | # Select ''Define Full-Text Indexing on a Table…'' and click the ''Next'' button. | ||
| + | # Select the database filed named'' PK_OCR_Contents'' as a unique index for this catalog and click ''Next'' button. | ||
| + | # Select the ''Next'' button. | ||
| + | # Name your new catalog '''OCRContent'''. ''Note: This name can not be changed, so please be careful.'' | ||
| + | # Accept the default location and continue by clicking the ''Next'' button. | ||
| + | # The inital index may take some time. | ||
| + | # When the Index is complete, verify that the population took place by looking at the ''Last Population Date'' in the '''OCR_Contents''' table. | ||
| + | ==Client Setup== | ||
| + | OCR is setup very similar to the way that Scan clients are setup. Administrators should create a shortcut within the shared OCR folder and modify the properties to point to the OCRmon.exe file via UNC path or IP Address. Point clients to copy this shortcut.<br />[[Image:Ocr shortcut.JPG]] | ||
Latest revision as of 18:21, 30 June 2008
Installation
Note: Please be advise, it is strongly recommended that OCR should be installed on a server other than the the server hosting the Scan Application.
- Find and run the Impact 3.31 Setup.exe. Note: You may need to download the Touchworks Scan [version].exe file from one of the various Allscript's FTP sites.
- Select the Server Setup radio button (this may be the default selection).
- Select the SearchMD radio button (top right side of page, under Server Type).
- Select the Next button.
- Verify the installation path.

- Using the default settings, confirm that the Program Folder is listed as OCR.
- Select the Next button.
- Provide the database connection information for both the Database name (will like be Impact), as well as 'Server Name or IP Address' -- this is the Server Name or IP Address to the Database Server. In addition, add the path to the shared Impact folder. Note: the default settings may not be correct.
- Select the Next button.
- Verify all information provided is correct.
- Select the Next button.


Configuration
OCR Configuration Tool
- Run the OCR Configuration shortcut that was placed on the server's desktop at the completion of the OCR install.
- Verify the following configuration settings:
- Impact Config Path - define where the Impact application is running (use Browse button to locate application. Specify UNC format)
- Filter Characters - specify characters to remove from OCR consideration (no spaces or other characters between items) - Leave blank
- Sleep Interval - specify the number of minutes to wait before checking for documents to be OCR processed (whole positive numbers only) - Set to 5
- Catalog Population - specify how to update Full-Text Search indexes. Select – “Use Scheduled Catalog Job”
- Catalog Interval - specify how often to update Full-Text Search indexes when Use Catalog Interval option is selected. Disregard this setting.
- Text File Output - check this box to write to the application directory, a text file for each document containing the set of recognized words - Leave unchecked
- Diagnostic Log - check this box to write to the application directory, a text file (OCRDebug.log) containing debug information for tech support - Leave checked until installation is verified, then uncheck.

SQL 2000 Full-Text Index
- Open SQL 2000 Enterprise Manager.
- Find and Expand the Impact database.
- Select Tables and locate the Table named OCR_Contents.
- Right-click on the OCR_Contents and select Full-Text Index Table.
- Select Define Full-Text Indexing on a Table… and click the Next button.
- Select the database filed named PK_OCR_Contents as a unique index for this catalog and click Next button.
- Select the Next button.
- Name your new catalog OCRContent. Note: This name can not be changed, so please be careful.
- Accept the default location and continue by clicking the Next button.
- The inital index may take some time.
- When the Index is complete, verify that the population took place by looking at the Last Population Date in the OCR_Contents table.
Client Setup
OCR is setup very similar to the way that Scan clients are setup. Administrators should create a shortcut within the shared OCR folder and modify the properties to point to the OCRmon.exe file via UNC path or IP Address. Point clients to copy this shortcut.