Difference between revisions of "Follow-up/Referral Worklist"
Michael.Dale (talk | contribs) |
|||
| (5 intermediate revisions by 2 users not shown) | |||
| Line 1: | Line 1: | ||
| − | + | Outlined below is a simple, fairly straight forward workflow to place a Follow-Up order and demonstrate how the order is placed into a worklist bucket for the Front Desk. | |
| − | + | ||
1.Log in as a provider | 1.Log in as a provider | ||
| − | 2.Select | + | 2.Select patient from schedule or search |
3.Go to the clinical desktop | 3.Go to the clinical desktop | ||
| Line 15: | Line 15: | ||
7.Select a favorite or search for follow up | 7.Select a favorite or search for follow up | ||
| − | 8.Select the desired follow up time (I selected follow-up 2 months) | + | 8.Select the desired follow-up time (I selected follow-up 2 months) |
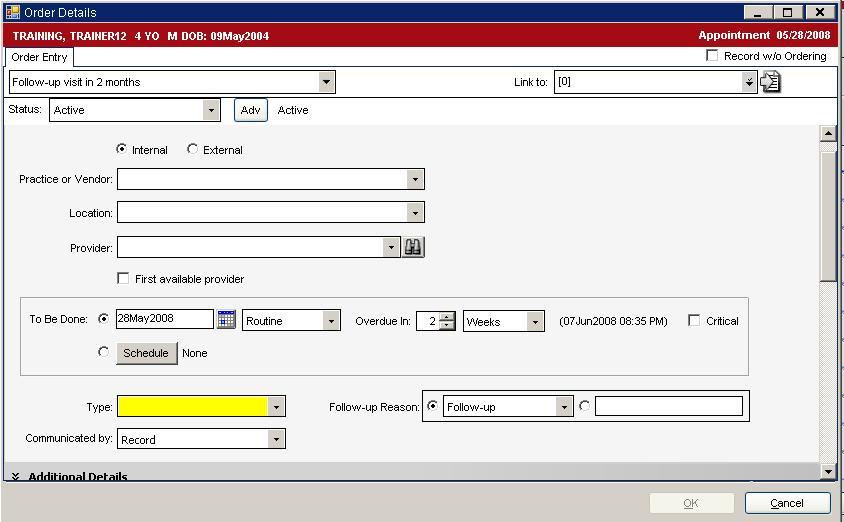
9.Select the internal radio button if patient is to follow-up within organization external for out of organization | 9.Select the internal radio button if patient is to follow-up within organization external for out of organization | ||
10,“Type” is the only required field for the provider to select. (I selected outpatient) | 10,“Type” is the only required field for the provider to select. (I selected outpatient) | ||
| + | |||
[[Image:detail 1.jpg]] | [[Image:detail 1.jpg]] | ||
| − | 11.However if this is to generate a worklist one more step is necessary. In the | + | |
| + | 11.However, if this is to generate a worklist one more step is necessary. In the "Additional Detail" field, the appointment status picklist defaults to “Appointment Not Needed”. This needs to be changed to “Appointment Needed” | ||
| + | |||
| + | [[Image:detail 2.jpg]] | ||
12.This changes the status to “Hold for, Scheduling” which one of the criteria for our worklist. | 12.This changes the status to “Hold for, Scheduling” which one of the criteria for our worklist. | ||
| Line 35: | Line 39: | ||
17.Under the dropdown for worklist views select the Follow up and Referral option. Note the newly created worklist. | 17.Under the dropdown for worklist views select the Follow up and Referral option. Note the newly created worklist. | ||
| + | |||
| + | |||
| + | [[Image:Worklist1.jpg]] | ||
Latest revision as of 14:58, 21 February 2012
Outlined below is a simple, fairly straight forward workflow to place a Follow-Up order and demonstrate how the order is placed into a worklist bucket for the Front Desk.
1.Log in as a provider
2.Select patient from schedule or search
3.Go to the clinical desktop
4.Go to the add clinical item for new orders
5.Click the Rx/Orders tab
6.Click the sub-tab FU/Ref
7.Select a favorite or search for follow up
8.Select the desired follow-up time (I selected follow-up 2 months)
9.Select the internal radio button if patient is to follow-up within organization external for out of organization
10,“Type” is the only required field for the provider to select. (I selected outpatient)
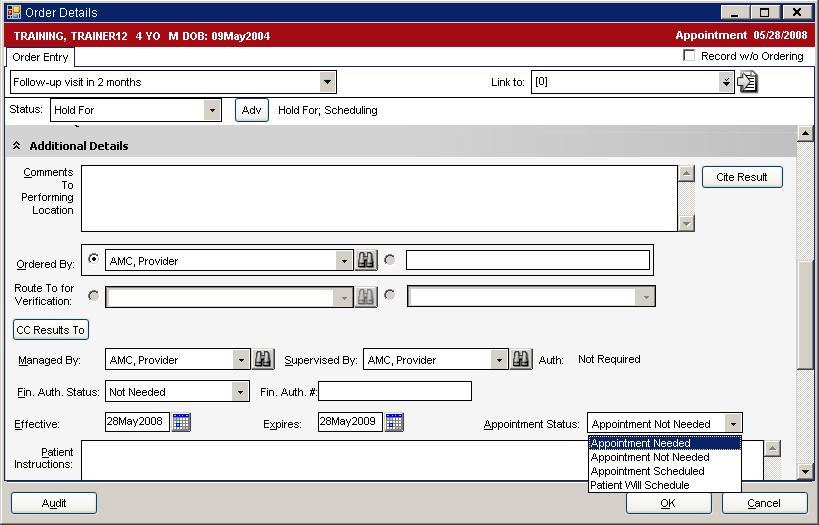
11.However, if this is to generate a worklist one more step is necessary. In the "Additional Detail" field, the appointment status picklist defaults to “Appointment Not Needed”. This needs to be changed to “Appointment Needed”
12.This changes the status to “Hold for, Scheduling” which one of the criteria for our worklist.
13.To finish click OK and Commit then save and continue.
14.Now log off and log in as a Front Desk user
15.To view this worklist click Tabs on the VTB
16.Click Worklists on the HTB
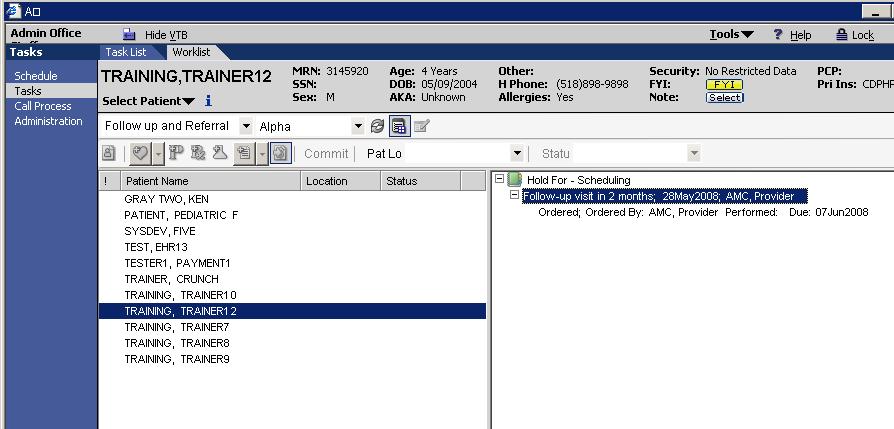
17.Under the dropdown for worklist views select the Follow up and Referral option. Note the newly created worklist.


